About the project
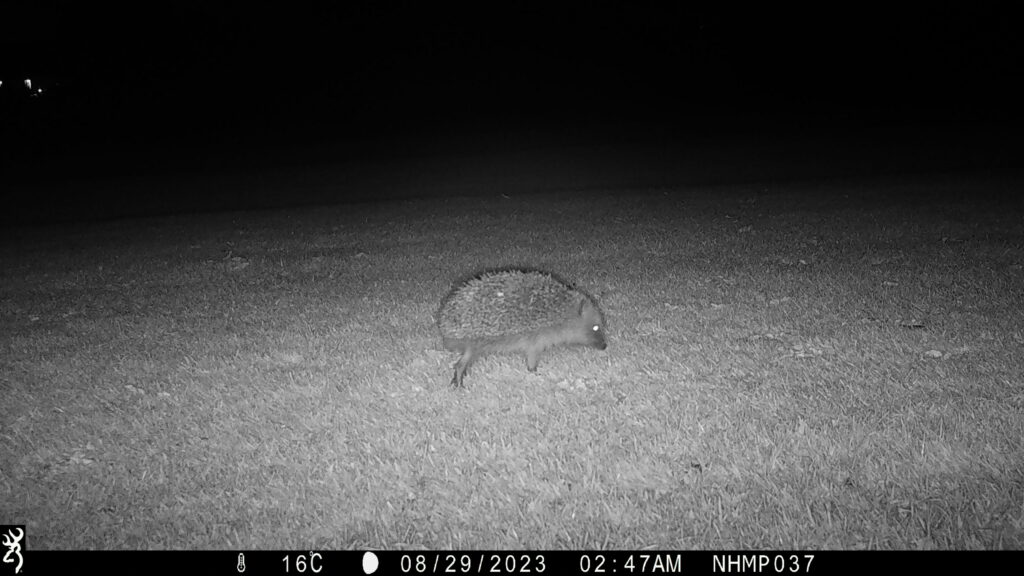
This is a pilot citizen science project to test the potential of using camera traps in gardens for monitoring small mammals, especially the West European Hedgehog. Many research projects use sensor-activated cameras as tools for monitoring wildlife. However, an increasing number of people already have camera traps in their gardens and monitor wildlife in their surroundings. This can be an invaluable source of information on what animals are present and where, and may even allow us to calculate their density: ‘gold standard’ variable for monitoring wildlife.
This study builds on experiences from the National Hedgehog Monitoring Programme. Spot a hog applies the same methodology as the NHMP, but this time you are the main suveyor! Click below to learn more!
Register your interest now!
Join our newsletter!
Who can join?
- participation is free
- we welcome anyone! (children should be supervised by an adult)
- you need to have your own camera trap by the start of the survey in May 2025
- we collect data from UK only (may be extended in the future)
How does it work?
- set up a camera trap before May following our protocol
- calibrate the camera using our instructions
- leave the camera for max. 30 days
- upload the images to citizen science platform Mammalweb.org
Why join the project?
- help in conservation of the West European Hedgehog in the UK- species listed as Near Threatened in Europe by the IUCN
- learn about camera traps
- support research on monitoring mammals
- provide invaluable data on hedgehog numbers
Read more about the impact of the project
Step by step tutorial
The process of joining the survey consist of the 4 steps. Please follow our step by step guide to learn about each of them. You can also download the whole instruction in a PDF format using the button below.
1. Installing the camera
In this step you will learn how to set up a camera trap following our protocol. It will include details such as settings of your camera and height of the attachment point. The standardisation of the survey is important to make sure that in every location the cameras are working on similar settings and we can compare the data between different camera types. Scroll down for more information.
2. Calibrating the camera
To allow for estimating the abundance of animals we need to extract certain metrics from the camera trap footage, such as the distance of the animal to the camera trap. This can be done by taking multiple pictures of the object of known size at certain distances from the camera trap. In this step you will learn how to prepare a calibration object, known as a ‘calibration pole’ and calibrate your camera.
3. Uploading the pictures to Mammalweb
Once your footage is collected, we ask that you upload it to a citizen-science platform called Mammalweb. This way all the data collected by citizen scientists in the UK will be collated on one platform and available for classification. In this step you will learn how to upload your footage to the platform.
4. Classifying images (optional)
When all the footage is uploaded to the Mammalweb platform, it will be sent through an AI filter, which removes images of humans and those obviously lacking wildlife, called ‘blanks’. Then, the remaining images will need to be classified, so the species category will need to be assigned to each image. In this step, also called ‘spotting’ you will learn how to assign species categories on the Mammalweb platform. This is an optional step to help with data analysis, but is not required to join the survey.
Step 1
Setting up the camera trap
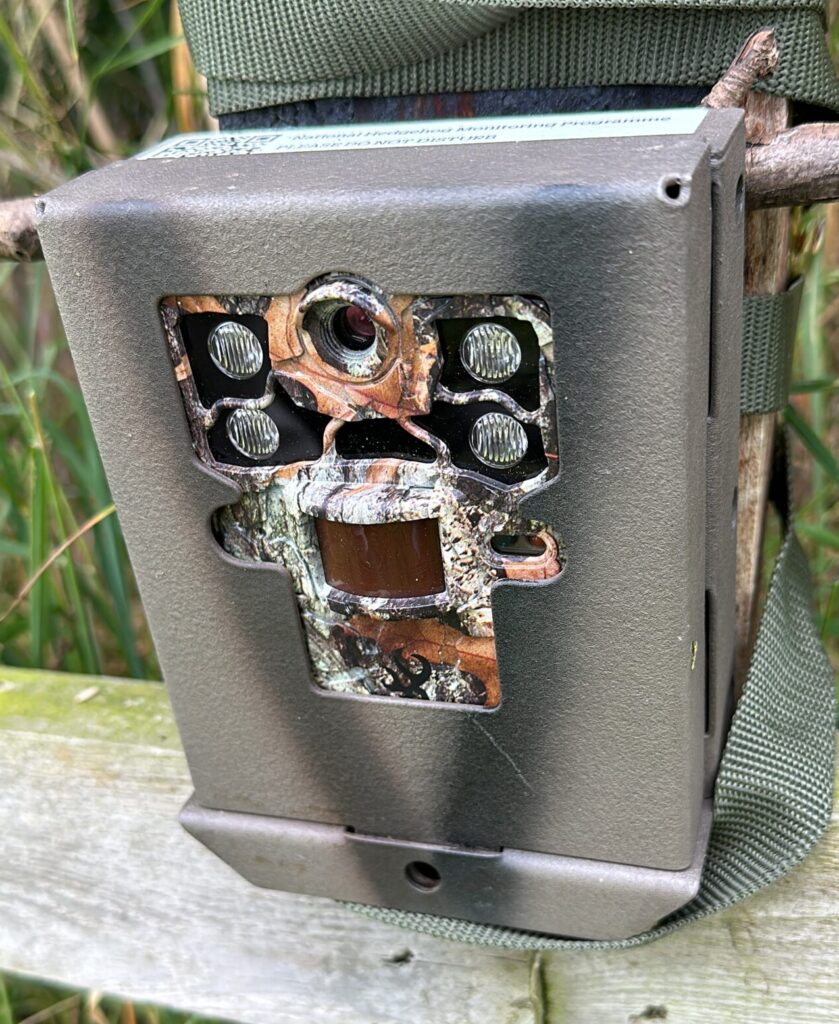
Camera requirements
Camera traps, or trail cameras, are devices used for monitoring wildlife. Depending on the type, they can be triggered by various sensors and take pictures and/or videos, when activated.
There are different brands of camera traps available. Good news- we accept all of them! However, to ensure that we can compare the data between the different camera trap types, we need to ensure that each camera trap is working on similar settings.
- If you already have a working camera trap, please adjust the settings for the period during which you participate in the survey.
- Please note- we do not accept footage from CCTV-like cameras with continuous recording; also, we cannot make use of isolated photos of animals.
Settings of the camera
Below you will find the list of settings to use on your camera trap. If you have questions regarding your camera settings, please email paulina.pawlikowska@ntu.ac.uk
Set the cameras for photos, burst mode
Please set your camera for photos only. Unfortunately, we cannot accept video footage, due to challenges associated with storing and analysing this format of data.
Set your camera to take multiple images once activated. This will increase the probability that the animal will be captured in the image if it is present in the area.
Set 24h (day and night) mode
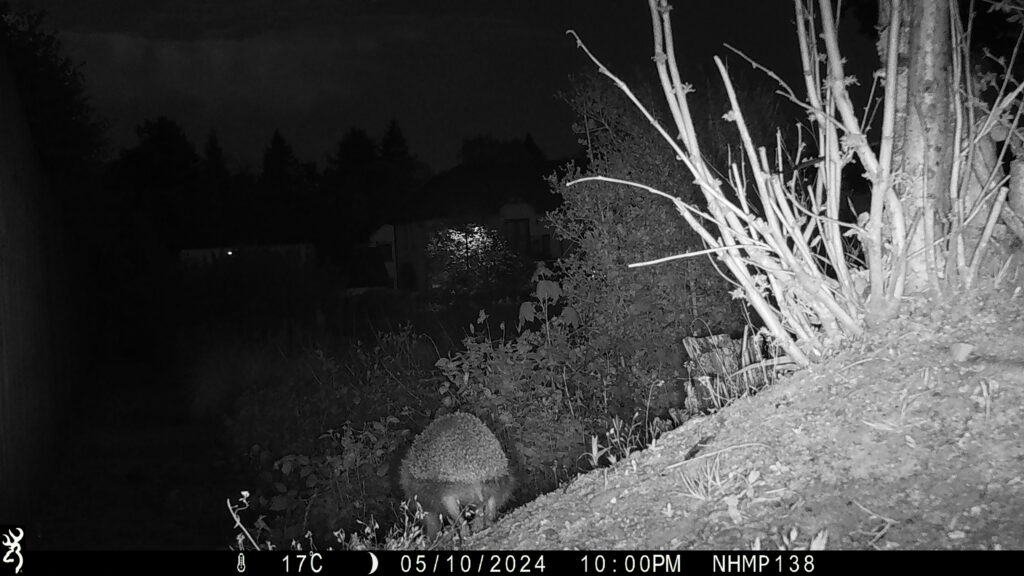
Please set your camera for 24h/ day and night recording. Hedgehogs are a nocturnal species but can be spotted during the day too.
Set correct time and date
Set the correct date and time on your camera trap. Make sure that the camera has enough battery and memory card space before the start of the survey. If your camera has an option of timestamp- please turn it on.
Please note that some camera traps operate on the US date formats (MM/DD/YYYY). Please make sure that the month and day are set accordingly on your camera.
Installing the camera
This an instruction on how to install your camera trap. Below you will also find a video tutorial. If you already have a camera trap, please adjust its position as described in the protocol.
Tutorial: how to set up your camera
1. Find an appropriate location
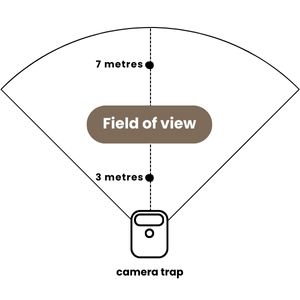
Find a vertical attachment point (fence post or small tree or similar) in your garden that provides a satisfactory field of view for the camera. Field of view is the space in which your camera trap is capturing animals. A satisfactory field of view will cover at least 3 metres back (ideally 7m) and 3 metres wide.
2. Attach the camera
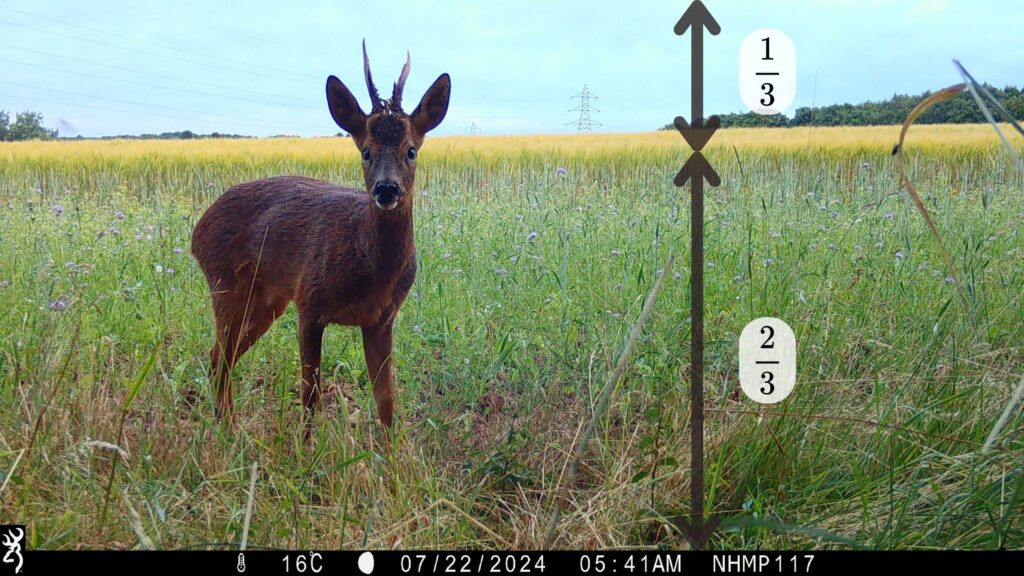
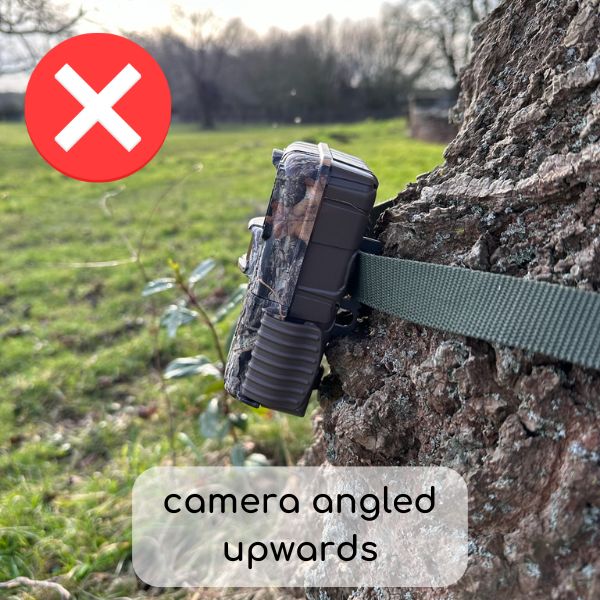
Attach the camera tightly, at around 25cm. It is important that the camera is not moved during the 1-month survey. If you already have a camera, move it to a desirable height.
When attaching the camera, pay attention to how it is angled. You want it to be capturing hedgehogs, so it shouldn’t point to the ground, as it will miss the hedgehogs that are further away, nor to the sky, as this will miss hedgehogs in front of it. A rule of thumb is that the ground covers 2/3 of the view, while the sky covers the remaining 1/3 (see picture below).
See below for examples of good and bad placements

TIP: You can check your camera’s field of view by turning it on and checking on your LCD screen if your camera has one or activate the camera so it takes a few pictures (while in the desired location), plug it in your computer and check for the field of view. Adjust it as necessary.
3.Clear the field of view of the camera
Remove the vegetation in the immediate surroundings of your camera trap. This is to ensure that the vegetation will not unnecessarily trigger the camera, filling up the camera’s memory card.
Well done, your camera is now properly installed! Don’t forget to turn it on before the next step! The survey will take place for 30 days in May. This means that you need to set up your camera no later than the 1 st of May and keep it running for 30 nights. Check our FAQ section on what to do if the camera stops working during the deployment.
Now it’s time to calibrate your camera!
Step 2
Calibration of the camera trap
Why calibrate the camera?
To allow for estimation of population size of hedgehogs, we need to extract certain metrics required by the analytical model that we use. This data includes: the angle of your camera trap’s field of view, the distance of the animal to the camera trap and the speed of animal passing in front of the camera. We will extract this data from your camera trap footage, but for us to be able to do this we need you to calibrate your camera.
Click to read more about estimating the abundance of animals from the camera trap footage
Preparing a calibration pole
First you need to start by preparing the calibration pole. Click here for a step by step instruction and video tutorial on how to prepare a calibration pole!

Calibrating the camera
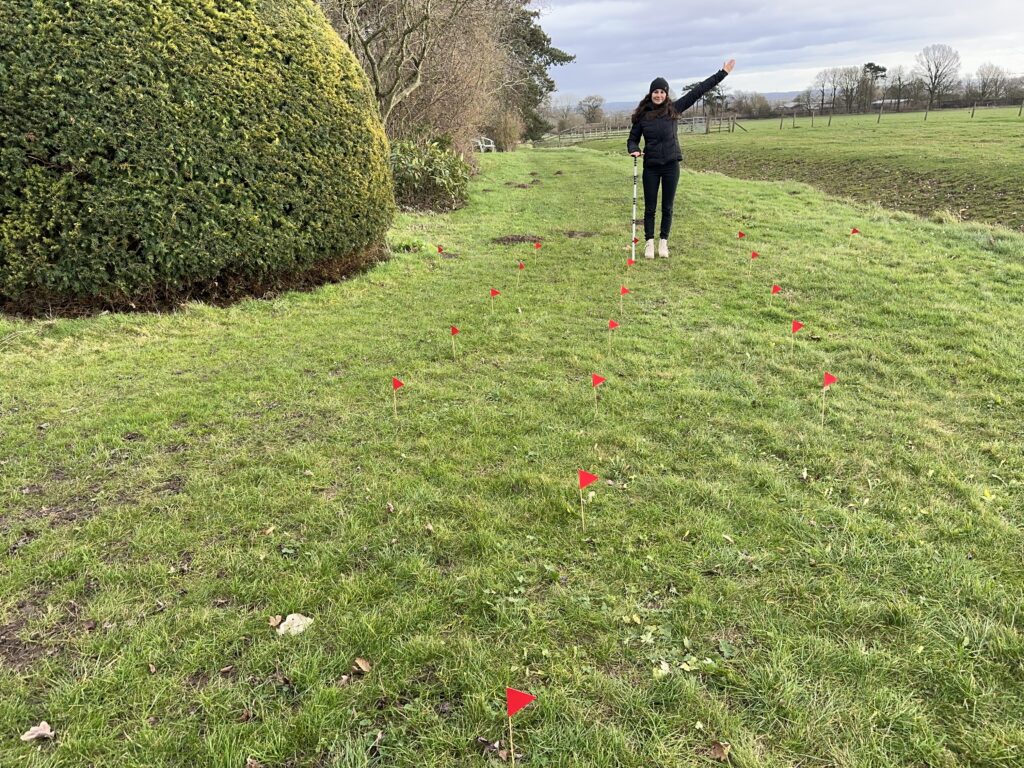
Once you have the calibration pole ready, you can proceed with the calibration of the camera trap. This step consists of taking approximately 15 pictures in you camera’s field of view. The pictures have to be at specific distances to the camera (very important!). This will let us analyse the distance of the animal from the camera trap.
Please see the video below with instructions on how to calibrate your camera or scroll down for a step by step tutorial:
You want to take:
- 1 image at 1 metre from the camera
- 1 image at 2 metres from the camera
- 3 images at 3 metres
- 3 images at 4 metres
- 3 images at 5 metres
- 3 images at 6 metres
- 5 images at 7 metres
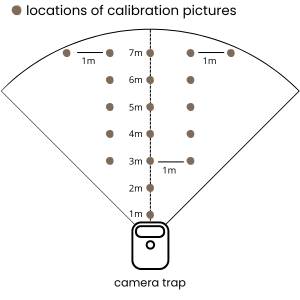
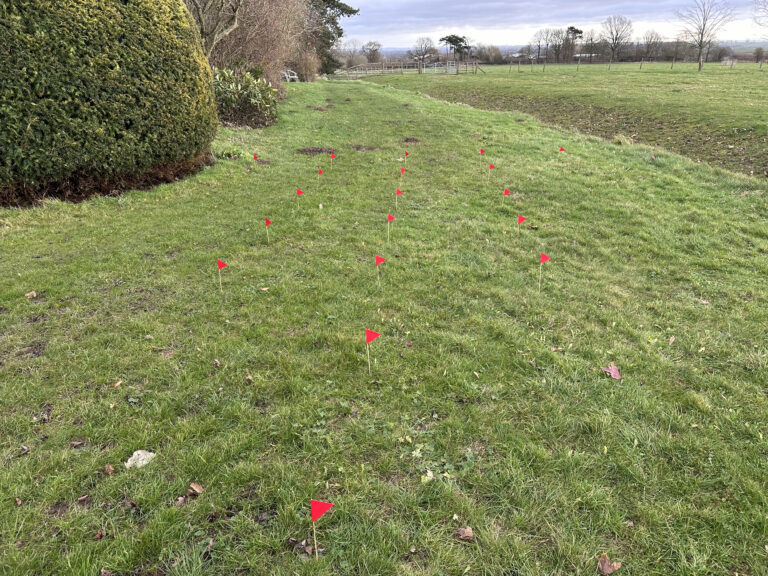
Start by measuring the distances with a measuring tape. Mark the locations where you need to take the images, following the grid presented above. You can mark them with anything that will be visible to you during the calibration, such as garden pegs, stones etc.
Please check on your camera trap if all markers are within the camera’s field of view, before moving to the next step.
Now we want to have images of the calibration pole at the previously marked locations. Please remember that this is a very important step that requires precision. You will need to hold the calibration pole in the previously marked locations and activate the camera by moving your other hand. Please see the video tutorial or scroll down for a step by step tutorial.
Grab your calibration pole so that you have 5 black stripes at the top. Place it in the previously marked location at a 90-degree angle to the ground. If you are on a hill, still place the pole perpendicular to the ground (even if it seems counter-intuitive!).

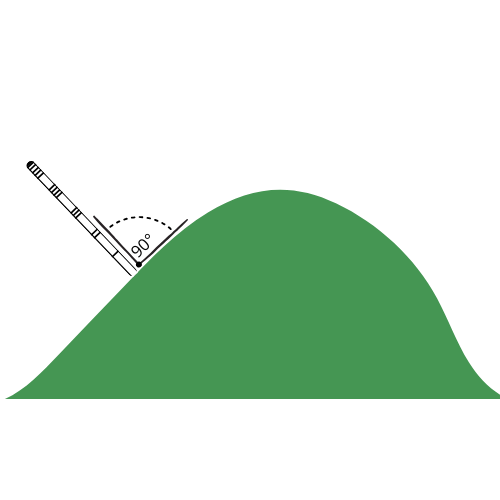
Hold the pole in a way that you do not cover the stripes. You can for example press the pole on the top with an open palm of your hand. As most of the camera traps are motion-activated, you will need to make some movement for the camera to take an image. You can try waving your other hand or leg for 10 seconds to give the camera enough time to take the image. Make sure that you don’t change the position of the pole while making the move!


Now move to the next location and take the image there as well. Follow the procedure untill you have taken images in all previously marked locations. You can remove the markers after the calibration.
Well done! Your camera has been successfully calibrated!
Now please record the date and time of the start of the survey and leave the camera undisturbed for 30 nights. Please make sure to upload them by the 30th of June 2025.
Step 3
Uploading images to Mammalweb.org
upload to MammalWeb
MammalWeb is platform for citizen science research using camera traps. To upload the images you will need to create a free account, unless you already have one, and upload your images to the Spot a Hog project. On the platform there are two main functions you can be: a Spotter or a Trapper. A Trapper is a person uploading camera trap footage and a Spotter is a person classifying the pictures by species.
Click below for a step-by-step tutorial on how to upload your footage to MammalWeb.
Step 4
Spotting
What is spotting on MammalWeb?
Spotting is the process of classifying camera trap pictures uploaded to MammalWeb, by assigning a species category to each of them. Anyone can become a Spotter, even if you haven’t uploaded any pictures! It is a great way of helping with research, as camera traps produce large numbers of pictures and classification of them can be challenging. It is also a great way to learn more about the animals living in the UK.
All pictures from all locations will be pooled together and presented randomly to citizen scientists.
Help us improve our study!
After the survey fill in an anonymous questionnaire sharing your experiences and ideas for improvement!
Spot a hog
Join the project!
contact: paulina.pawlikowska@ntu.ac.uk
Camera trap images on this website are a courtesy of the National Hedgehog Monitoring Programme
Subscribe to our newsletter!